How to Use Filie
Filie is the fastest way to send files between your devices — phone to laptop, iPhone to Android, Mac to Windows. No account, no cloud sign-in, no compression. Just send.
In This Guide
- What is Filie?
- Installing Filie
- Sharing Your Device
- Adding Devices by IP Address
- The Main Screen
- Sending Files on the Same Wi-Fi
- Sending Files Over the Internet
- Using Short Codes
- Using QR Codes
- Files
- Favorite Devices & Device Details
- Groups
- History
- Cloud Subscription
- Settings & Personalization
- Keyboard Shortcuts
1. What is Filie?
Think of Filie like AirDrop — but it works between any two devices, on any platform, even if they're not in the same room.
Filie sends files directly between your devices. Photos, videos, documents — whatever you want to send, Filie moves it without touching it. No compression, no resizing, no middleman reading your stuff. We do encrypt it, of course, with a shared key that is derived by the two devices. Only the receiving device can decrypt the files. That is end-to-end encryption. Accept nothing less.
There are two ways Filie can send:
- Local (Wi-Fi) — when both devices are on the same network. Fast and free. Great for home and office.
- By IP (VPN) — when both devices are connected through a VPN. A variation of local, it is also free, and covers anytime automatic discovery may not work, such as a hotel, airport, or corporate network.
- Cloud — when devices are on different networks or in different places it goes through Filie's service. Again, your files are encrypted, and only the intended recipient can decrypt them.
Filie works on iPhone, iPad, Android, Mac, Windows, Linux, and Web. Mix and match any combination.
2. Installing Filie
Get Filie on each device you want to transfer between. It's free to download.



 Microsoft Store
 Linux Install
3. Sharing Your Device
Before you send anything, it's worth setting yourself up to be found. Sharing your device link is the way to connect with someone not on your local Wi-Fi.
Share your device link with others using SMS, email, Microsoft Teams, Slack, social media, or any other communication method. You can even download the QR code.
Open Settings — you'll find Copy, QR Code & Share, and Email buttons for your device's link. Send that link to someone and when they open it, Filie adds you as a Favorite on their device automatically. Their device is also automatically added to yours too.
Saving the QR code image also copies the link it contains to your clipboard, so you can paste it straight into a message.
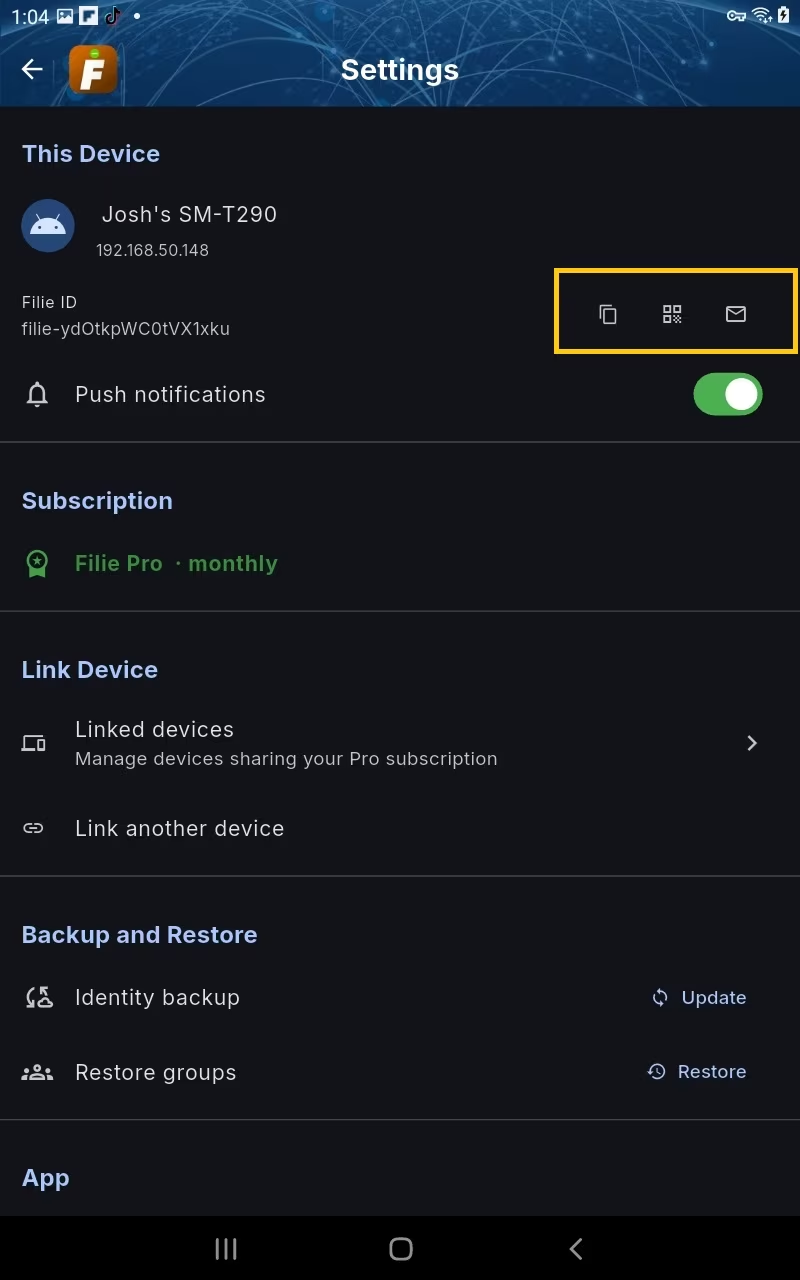
The easiest way to connect is discovery on the same Wi-Fi network. Simply tap the star next to the device to make it a favorite. Note that tapping the favorite star does not add your device to their favorites.
4. Adding Devices by IP Address
On the same Wi-Fi, Filie finds nearby devices automatically. Some networks block that — VPNs, and many hotel, café and cloud networks — even though the devices can still reach each other. On those networks, add the other device by its IP address instead.
When You Need It
- On a VPN — including the Nettica VPN Service and Nettica VPN Agent. Both devices need to be on the same VPN.
- On a network that hides devices from each other — the other device doesn't show up under Devices, even though you're both connected.
- Across subnets — for example, a desktop on wired Ethernet and a phone on a separate Wi-Fi network in the same office.
Opening the Screen
Open Settings and find Discovery (near the top) to find Add devices by IP address. Once you've added some, it shows how many. On Windows, macOS and Linux you can also tap the + beside Devices on the home screen.


Step 1 — Find the other device's address
On the device you want to reach, open the same screen. This device's addresses lists every address it has, each labelled with the network it's on — your Wi-Fi, your VPN, and so on. Pick the one on the network you share. On mobile, you will need to find the device's VPN address from the Nettica VPN Agent itself.
Step 2 — Add it on this device
Type the address into the field and tap Add. Filie reaches out to it right away. You only need to do this on one side — once they connect, both devices see each other. Note that one or both devices may need to confirm the favorite based on each device's app settings.
Step 3 — Wait for it to answer
When the other device answers, it's saved as a favorite and appears under Devices with a By IP pill. The address stays listed in the dialog with the device's name under it. From here, you send to it just like any other nearby device, and the transfer can fail over to Wi-Fi or even the cloud, like any other Filie transfer, if the connection drops.
If it hasn't answered yet, the address shows Waiting for it to answer and Filie keeps trying while it's listed. If using a VPN it must be switched on to complete the setup.
Frequently Asked Questions
Which VPNs does Filie support?
Adding by IP address can be used with any VPN. However, the only supported VPN is the Nettica VPN Service, because it is so easy to use.
Does send by IP address require a subscription?
No. It is considered a local transfer. Filie (and Nettica) only require a subscription when you consume our resources (bandwidth, storage, etc).
If It Doesn't Connect
- No answer — nothing responded at that address. Check both devices are on the same VPN or network, and that you typed the right address.
- Answered, but Filie is not running there — the device is reachable. Open Filie on it.
- Turned the request down — make sure both devices have the latest Filie.
- This device — that address belongs to the device you're on. Use the other device's address.
Removing a Device
Tap the × beside an address to stop reaching the device at it. The device stays in your favorites, so it still works over the cloud or when it's found on the same Wi-Fi. Removing the favorite itself removes its address too.
5. The Main Screen
When you open Filie, you'll see the main screen. Everything starts here.

Home is organized into sections, top to bottom:
- This Device — your own device. Tap it to open Settings.
- Devices — your Favorites and any other devices running Filie on the same Wi-Fi. The + in the section header scans another device's QR code to add it.
- Invitations — shows up only when someone has invited you to a group.
- Groups — the groups you belong to. The + in the section header makes a new group, even your very first one.
If a section is empty, Home says so and tells you how to fill it, rather than hiding the section.
The Send Buttons
To start a transfer, pick your files first. Send files is how you do that — tap it and choose files from your documents or anywhere else on your device. On iPhone, iPad, Mac, Windows and Linux there's also a Send photos button that opens your photo library. Once you've picked files, you're back on Home, where you can tap a device or group to send to.
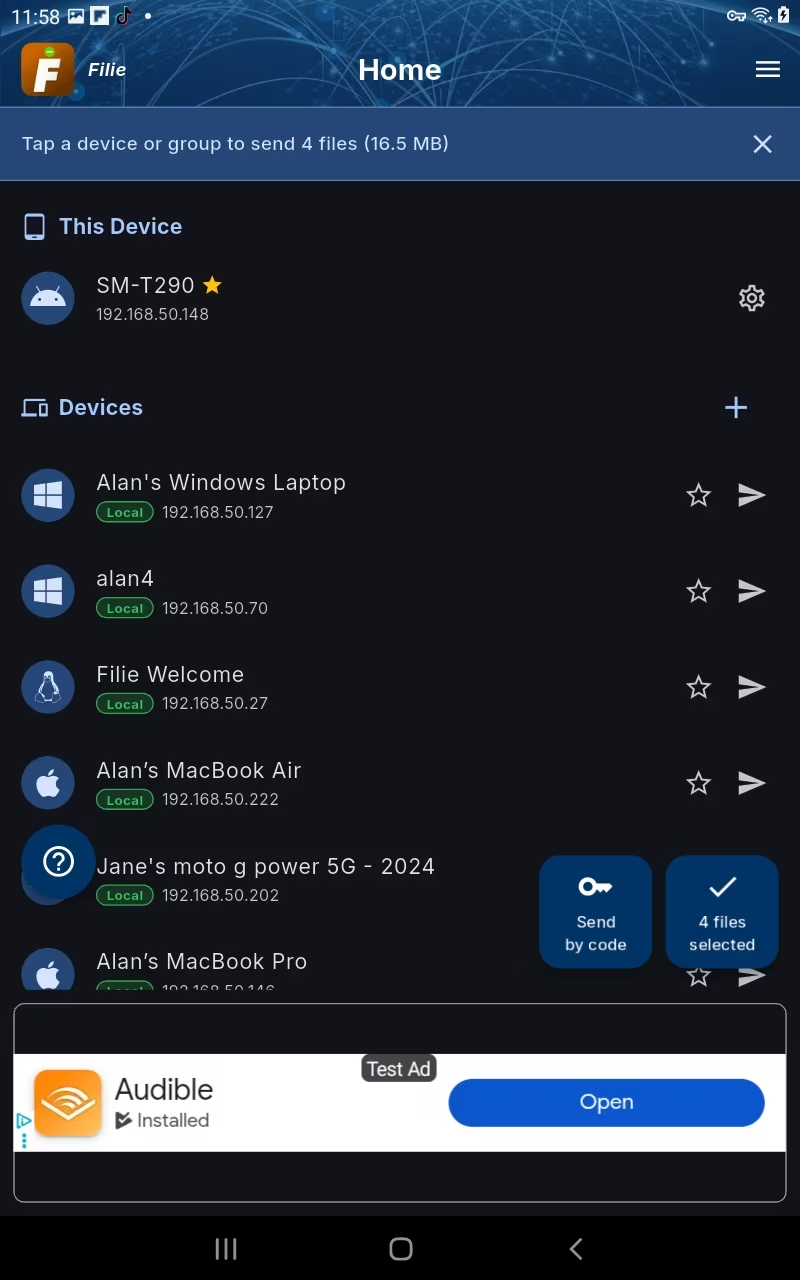
While files are waiting to be sent, the buttons change: Send by code creates a code for someone who isn't in your list (see Using Short Codes), and the files selected button shows how many you've picked — tap it to cancel and clear the selection. A banner across the top also says what's waiting to be sent, and its × cancels too.
Receive Code
The main screen also has a Receive code button. Tap it and enter a code someone gave you to receive their files, without needing them on the same Wi-Fi.
Upgrade to Pro
If this device doesn't have a subscription, a green Upgrade to Pro button sits beside the others (it reads Renew Pro if a subscription has lapsed). See Cloud Subscription.
Local vs. Cloud Pill
Next to each device you'll see a small Local or Cloud pill. Filie automatically picks the best way to reach that device — Local when it's on the same Wi-Fi, Cloud when it isn't. The pill tells you which one Filie is using.
Device Details
Each device row has a star to add or remove it as a Favorite, and a › button that opens the device's details: its fingerprint, how it's reachable, and a nickname you can give it. See Favorite Devices & Device Details.
Main Menu
The main menu button is in the header, top left. It opens a drawer with Home, Files, History, Subscription, Settings, About, and Rate us. Devices and Groups aren't separate menu items any more — they both live on Home.
The top of the drawer shows this device's name — tap it to rename the device — along with your plan. Pro subscribers can also tap the device icon there to choose a custom icon.

Getting Back Home
There are three ways home from anywhere in the app:
- Tap the Filie logo in the top left. On Home itself, tapping the logo refreshes the device list.
- Press back (or swipe back on Android). From any menu section, back takes you to Home; inside a folder or a group, it steps back one level first.
- Open the menu and choose Home.
When you're a level or more deep — inside a folder, or in a group's details — a back arrow takes the menu button's place, top left.
6. Sending Files on the Same Wi-Fi
This is the easiest way to use Filie. Both devices on the same Wi-Fi, and you're done in seconds.
Step 1 — Open Filie on both devices
Make sure both devices have Filie open and are connected to the same Wi-Fi network. The devices should see each other automatically within a few seconds.
Step 2 — Pick your files
Tap Send files (or Send photos) and choose what you want to send — photos, videos, documents, anything. You can also select files in Files and head back to Home. On Mac, Windows and Linux, you can drag and drop files straight onto a device or group.
Step 3 — Tap the device you want to send to
After picking files, tap the name of the other device in the list. If you don't see it, make sure both devices are on the same Wi-Fi and Filie is open on both.
Step 4 — Accept on the other device
The receiving device will show a request. If the sending device isn't a Favorite, you'll need to tap Accept. Once accepted, the transfer starts immediately.


Step 5 — Done
That's it. Files land in the receiving device's downloads or photo library, depending on the file type and platform.
7. Sending Files Over the Internet
Cloud transfers let you send to any device anywhere — different Wi-Fi, different city, doesn't matter. The recipient doesn't even need to be online.
Cloud transfers require a subscription on the sending device. Receiving is always free — the receiving device never needs a subscription.
No Setup Required
Cloud is on by default — there's nothing to enable. Filie registers your device with the cloud automatically in the background (this registration only lasts an hour). When you send a file, Filie uses your local network if the other device is nearby, and falls back to the cloud if it isn't.

How it Works
Your files are encrypted on your device before they go anywhere. Filie's edge servers move the encrypted data — we can't read it, and neither can anyone else except the person you're sending to. If the recipient is not online, Filie will maintain the files for up to 24 hours. We can also send a push notification to alert the recipient of the incoming transfer.
Finding the Other Device
To send to a device over the cloud you need to connect using a Short Code, a QR Code, or a Deep Link — or the device needs to already be in your Favorites. Once you've picked your files, a Send By Code button appears so you can generate a code for the other person to enter. See the sections below for each method.
8. Using Short Codes
Short codes are a simple way to connect two devices that aren't on the same Wi-Fi.
Getting Your Code
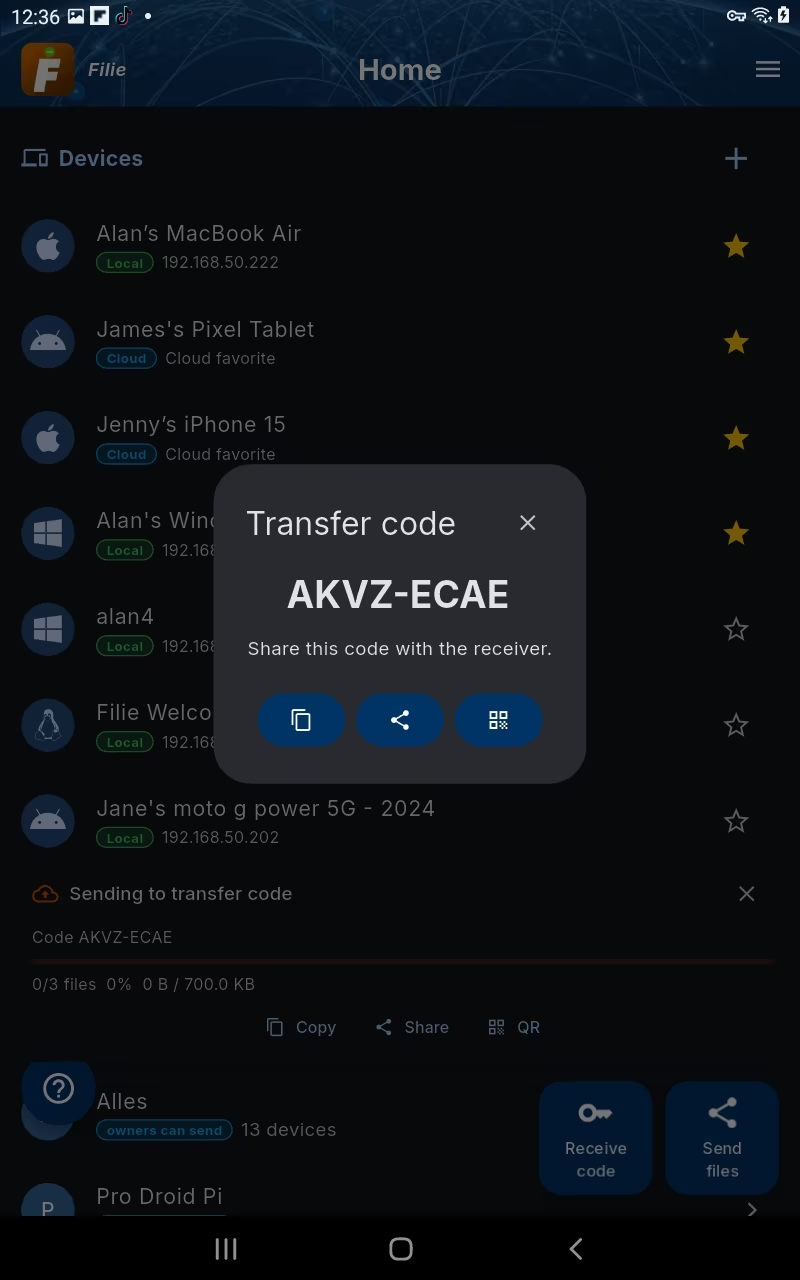
On the sending device, pick your files first, then tap Send By Code. Filie will show you an 8-character code with a dash in the middle (like K3D9-7QRT). That code is active for a limited time.

Entering the Code
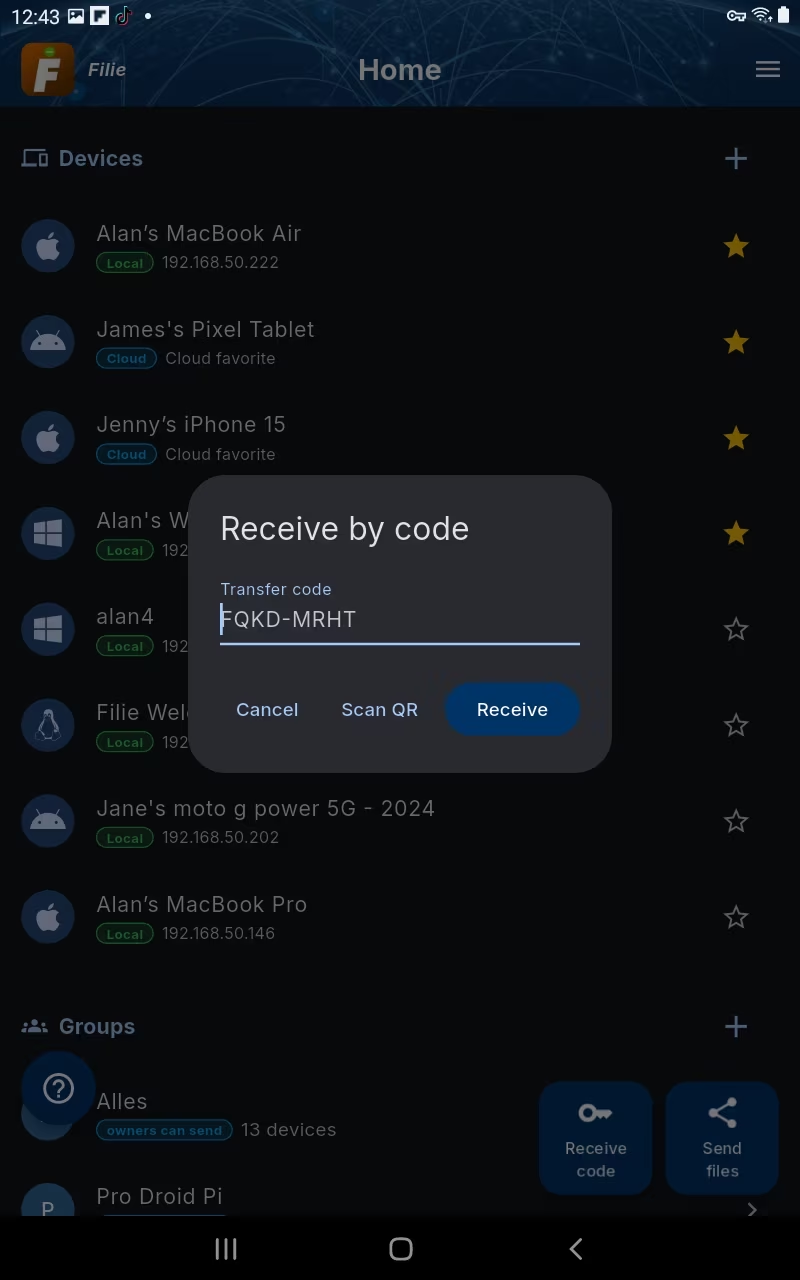
On the receiving device, tap Receive code on the main screen and type in the code. Filie will connect to the sending device and start the transfer.
9. Using QR Codes
QR codes are a way to connect two devices without typing anything.
Showing Your QR Code
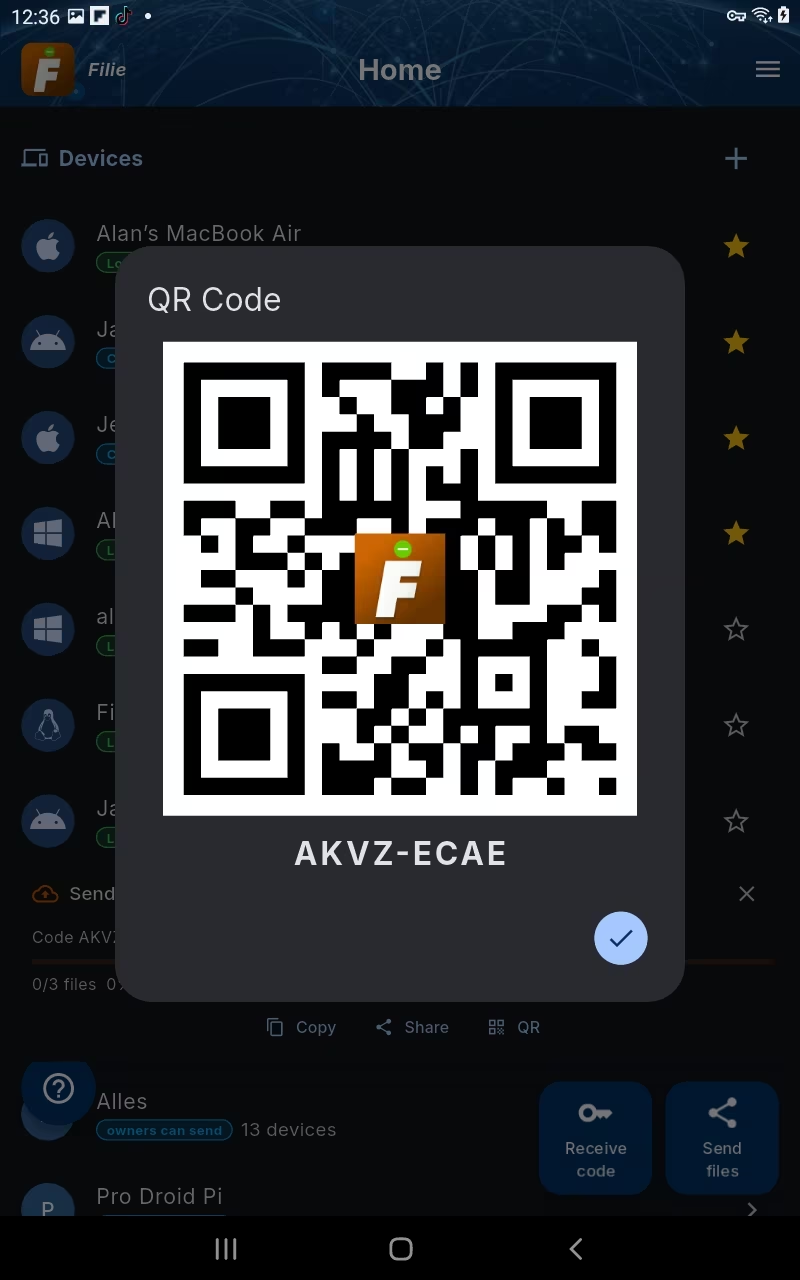
On the sending device, tap the Send by Code button, then tap the QR Code option. A QR code appears on screen.
Scanning the Code
On the receiving device, tap Receive code, then Scan QR, and point your camera at the QR code. Filie reads the code and connects instantly. No typing required.
10. Files
Everything you receive lands in one place, and Files is how you get at it — without digging through a system file picker to find it. (This section used to be called Browse.)
Open Files from the main menu. You get the files Filie has received on this device, newest first, with a thumbnail for photos and videos so you can pick one out by sight instead of by filename.
Files remembers where you were. Leave to send something or check on a transfer, come back, and you're in the same folder with the same files still selected.


Each Row
Every file shows its size and the date it arrived. On the right are three buttons: rename, share, and delete. Rename edits the name in place — no dialog. Share hands the file to any other app on your device.
The More Menu
The header keeps just two buttons: search (the magnifying glass) and more (⋮). Search filters the folder by name as you type — useful when a folder has a few hundred things in it. Everything else is in the more menu:
- Select — start selecting files.
- View — List view or Icon view, with a check beside the one you're using.
- Sort by — Newest first, Oldest first, Name A–Z, Name Z–A, Largest first, or Smallest first.
- Extract all and Open in another app — only when you're inside an archive (see Zip Files).

Working With Several at Once
Long-press any file (or choose Select from the more menu) to start selecting, then tap the rest. The header tells you how many you've picked and swaps in the actions that work on a whole set: select all, share, and delete, with Rename and Move in the more menu. Select all turns into select none once everything is picked. The back arrow ends selecting.

Moving asks where to put things. Pick a folder from the list, step into it, or make a new one — the trail across the top always shows where you are, and the button names the folder you're about to move into.
Sending Files From Files
What you select in Files is what Filie sends. Select the files you want, then go to Home — tap the Filie logo, or press back — and Home is already waiting for you to pick a device or a group, with those files queued up. Come back to Files and your checkmarks are still there; change them and Home picks up the new list. Tapping the files selected button on Home clears the checkmarks in Files too.
You can gather files from more than one folder into the same send: select some, step into another folder, and select more. Tapping a folder always opens it; long-press a folder if you want to select the folder itself to move or delete it.
The share button still does what its name says: it hands the files to another app through your device's share sheet. On Linux, which has no share sheet, it takes you straight to Home to pick a device.
Sending From Other Apps
Filie also works from anything that can share — your photo library, your files app, a document you're reading. Pick Filie in the share sheet, and Filie opens on Home with those files queued up, ready for you to choose a device or a group.
Opening a File
Tap a file and Filie opens it itself. Photos, video, audio, PDFs, plain text and Markdown all display in the app, and you can swipe sideways to move through the rest of the files in that folder — handy for going through a batch of photos someone just sent you. Photos open full screen; tap once to bring the name and back button back.
Anything Filie can't display offers to open it in another app instead.
Folders
Folders sit at the top of the list, above the files. Tap one to go in, and the back arrow in the header steps you back out — however many levels deep you've gone. Sorting and searching apply to the folder you're looking at, so searching inside a folder searches that folder.
To make one, select the files you want to gather up and choose Move from the more menu. The picker that opens has a new-folder button, and it drops you straight inside the folder it just made, ready to move the files in. That's the quickest way to tidy a pile of received files into something you can find later.
Zip Files
Zip files open the same way: tap one to look inside without unpacking it, or use Extract all to unpack the whole thing beside the archive.
The same handler opens anything that's a zip under another name, along with tarballs. That covers app and library packages, where looking inside is usually the point:
- Android — .apk, .aab, .apks, .xapk
- Windows — .msix, .msixbundle, .appx, .appxbundle
- Apple — .ipa
- Java — .jar, .war, .ear, .aar
- Packages — .whl, .nupkg, .vsix, .xpi
- Tarballs — .tar, .tar.gz, .tgz, .tar.xz, .txz, .tar.bz2, .tbz2, .tbz
Once you're inside an archive, the more menu offers Extract all, which unpacks everything into a folder named after the archive, right beside it. For archives that mean something to the system, there's also Open in another app, which hands the file itself to the operating system — an .msix on Windows launches the installer, and a .tar.gz on Linux opens in the system archive tool. A plain .zip doesn't get that option, since Filie is already showing you everything a system unzip tool would.
Document formats that happen to be zips underneath, like .docx, .xlsx, .pptx and .epub, are deliberately left out. Tapping one opens it in the app that reads it, not a list of its internal parts.
Buttons at a Glance
Every button you'll meet in Files, and what it does. Items marked More menu are in the ⋮ menu rather than on the header.
| Icon | Name | Description |
|---|---|---|
 Android Android
 iOS & macOS iOS & macOS
 Windows Windows
 Linux Linux
| Share | Hands the file, or everything selected, to another app through your device's share sheet. On Linux it takes you to Home to pick a device. The icon shown depends on your platform. |
 | Back | Steps back out of the current folder, one level at a time, or ends selecting. |
 | Menu | Opens the main menu, top left. |
 | Search | Filters the folder by name as you type. |
 | Close | Clears the search, or cancels a rename in progress. |
| More | Opens the more menu: Select, View, Sort by, and archive actions — or Rename and Move while selecting. | |
 | Select | More menu. Starts selecting files. Long-pressing a file does the same thing. |
 | Select all | Picks every file in the folder at once. |
 | Select none | Clears the selection. Replaces Select all once everything is picked. |
 | Rename | Edits the file's name in place, right on its row. While selecting, it's in the More menu (and it's the only way to rename in icon view). |
 | Move | More menu. Moves the selected files into another folder, or into a new one. |
 | Delete | Deletes the file, or every selected file, after asking you to confirm. |
 | Open in another app | Opens the file you're viewing in a different app on your device. Inside an archive, it's in the More menu. |
 | Extract all | More menu. Unpacks a zip file into a folder beside the archive. |
11. Favorite Devices & Device Details
Favorites are devices you trust. Transfers from a Favorite skip the approval step and go straight through — on Wi-Fi or over the cloud.
Adding a Favorite
After a successful transfer, you can save that device as a Favorite. Or scan their QR code, or use a link (see Sharing Your Device). Every device has a star next to it — tap it to add or remove a Favorite. Favorites show a filled yellow star, everyone else shows an outline, and Favorites are always listed on Home whether they're online or not. Filie asks you to confirm before removing a Favorite.

Auto-Accept
Files from a Favorite device come through automatically — no approval prompt. This is great for sending between your own devices. Just send from your phone and the files show up on your Mac without touching anything.
Device Details
Tap the › at the end of any device's row to open its details. Tapping the row itself sends to that device when you have files picked, so details get their own button.
- Nickname — tap the pencil to give the device a name that makes sense to you, like "Mom's phone". Only you see it; it doesn't rename the other device, and the device's own name stays visible underneath.
- How it's reachable — On this network with its address, or Reachable through the cloud.
- Device fingerprint — a short code unique to that device. Tap it to copy it.
- Remove from cloud favorites — for Favorites.

Checking a Fingerprint
Two phones can easily have the same name — three people in a room with an "iPhone 15 Pro Max". The fingerprint tells them apart. Before sending something private, open the device's details and compare its fingerprint with the one the other person sees in their own Settings, under This device's fingerprint. If they match, it's the right device.
Names and Icons
When someone renames their device or picks a new icon, you'll see the change the next time Filie finds it on your network or refreshes it from the cloud.
12. Groups
Groups let you send to multiple devices at once — great for families, teams, or any situation where everyone needs the same file.
For more information about groups, see the Groups page.
Creating a Group
Groups live on Home. Tap the + beside the Groups heading, give the group a name, and choose its type. Then add devices from your Favorites.
Group Types
- Shared — anyone in the group can send.
- Channel — only owners send; everyone else receives.
- Inbox — members send to the owners only.
Group Details
When you don't have files picked, tapping a group opens its details, where you can send, message the group, change its settings, give it an icon, invite devices, or leave. Group icons show everywhere the group does — on Home, in the group picker, and in the details — and the group's owners can set one; it doesn't need a subscription. The back arrow in the top left returns you to Home.

Invitations
When someone invites you to a group, the invitation appears in an Invitations section on Home. Accept or decline it right there.
Sending to a Group
Pick your files, then tap the group on Home — the same way you'd send to a single device. Filie delivers according to the group's type. Groups always send through the cloud, even if members are on the same Wi-Fi.
13. History
History shows what this device has sent and received — including what's happening right now.
Open History from the main menu. Transfers still running appear at the top under In progress, with the same live cards as the transfer tray. Completed, failed and cancelled transfers are listed under Finished.
Send Again
Every finished transfer has a Send again option — for something you sent, something you received, and for transfers that failed. It's the quickest fix for "that didn't arrive". If the files have since been moved or deleted, Filie tells you so.

14. Cloud Subscription
Local transfers are always free. Cloud transfers — sending to devices on different networks — requires a subscription.
What You Get
- Unlimited cloud transfers
- Removal of 20-file limit
- Up to 10 devices covered per subscription
- Works across all your platforms — iOS, Android, Mac, Windows, and Linux
The Subscription Screen
Open Subscription from the main menu to see where this device stands: your plan and when it renews. If this device is using a subscription linked from another of your devices, it says Shared from and names that device — and if that subscription ends, Pro ended on that device — so you know exactly which store account to look at.
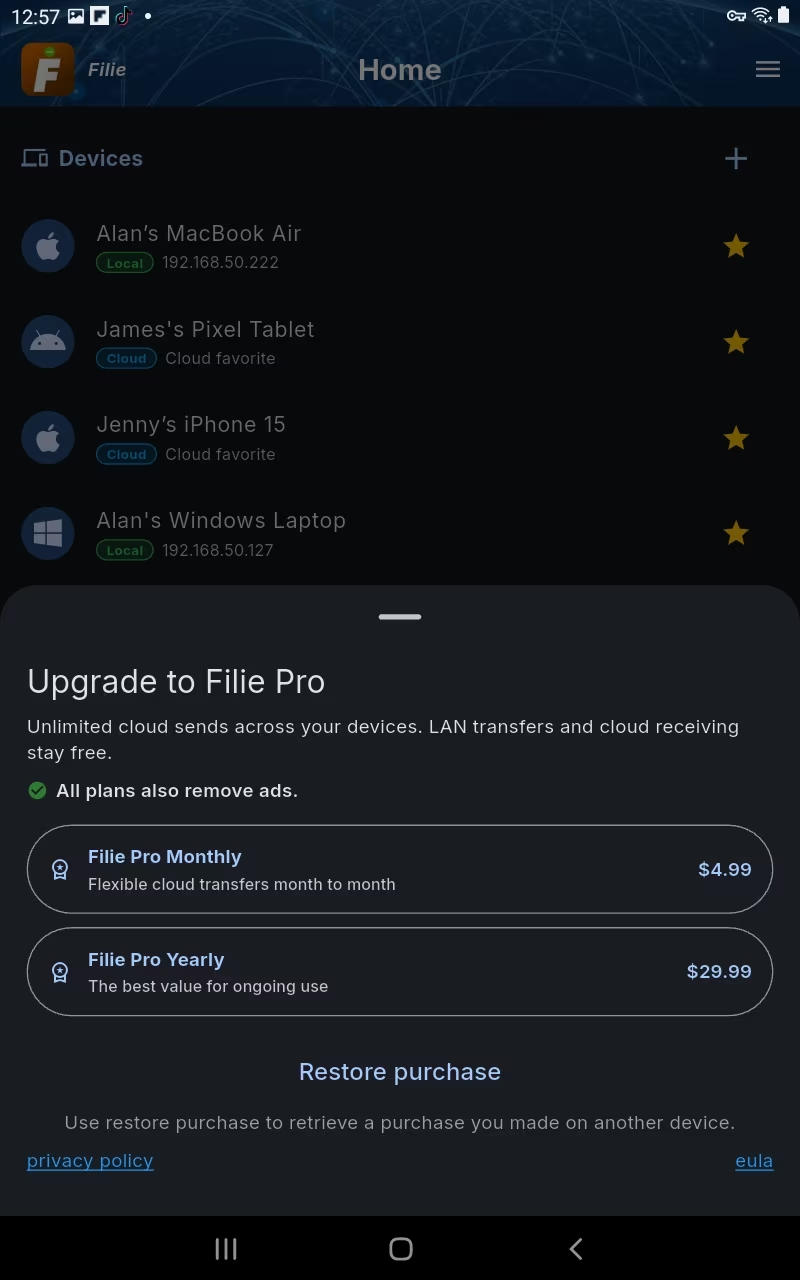
From here you can Upgrade to Pro (or Renew Pro), Restore Purchases, and jump to Link Device. On the device that owns the subscription, Manage in the store opens your Apple or Google Play subscriptions — that's where you change or cancel a plan.
Subscribing
Tap Upgrade to Pro on Home, on the Subscription screen, or in Settings. On iPhone, iPad, Mac and Android, payment goes through your device's app store — Apple or Google — so your billing info never touches Filie's servers. On Windows and Linux, the purchase finishes in a secure checkout in your browser; return to Filie afterward and tap Check purchase.
Linking Your Devices
One subscription covers up to 10 devices. On devices that use the same app store account, tap Restore Purchases after subscribing — in Subscription or in Settings. This tells Filie that all those devices belong to the same subscription — no account or sign-in needed.
To link devices across platforms, use Link Device in Settings. You enter the code displayed on the device you want to link. This is also where you manage and remove linked devices.
15. Settings & Personalization
Settings is where you name your device, share its link, and tune how Filie behaves. Open it from the main menu, or tap your device under This Device on Home.
This Device
- Name — edit it right in place, then tap the checkmark. You can also rename the device by tapping its name at the top of the main menu.
- Icon — Pro subscribers can tap the device's icon to pick one from a set, instead of the standard platform icon. Other devices see it too. You can always go back to the platform icon.
- Filie ID and link — Copy, QR code and Email buttons for sharing your device (see Sharing Your Device).
- Revoke shared links — appears once you've shared your link. People who open a link you already sent can still add you, but they won't be added back to your Favorites automatically.
- This device's fingerprint — what other people see when they check your device's details. Tap to copy.
- Push notifications — so you hear about incoming cloud transfers and group activity.
Discovery
Find devices on this network controls whether Filie announces itself on your Wi-Fi. It's on by default. Turn it off on a network you don't trust — a conference, a hotel, a client's office — and the switch turns red so you won't forget it's off.
Off means nearby devices can't find this one. Devices you've already paired can still reach it, and cloud transfers work as usual.
Below it, Add devices by IP address reaches devices that can't be found this way — see Adding Devices by IP Address.


App Settings
- Language — follow the system, or choose one of Filie's supported languages.
- Default receive location — the folder received files are saved to. Tap Browse to pick a different one. On Android, Windows, macOS and Linux.
- Save photos & videos to Photos — put received photos and videos in your photo library. On iPhone, iPad and Android.
- Auto-accept all transfers (not just favorites) — accept incoming files from any device without asking. Favorites are always accepted automatically.
- Automatically add devices to favorites — make a device a Favorite as soon as a transfer with it finishes, instead of asking you first.
- Always use cloud — send through the cloud even when the other device is on the same network.
- Show in system tray / Show in menu bar — on Windows, Linux and macOS, keep Filie running when its window is closed.
- Sound effects — play a chime when a transfer finishes.
- Haptic feedback — vibrate on taps and when a transfer finishes or fails. On iPhone, iPad and Android.
- Reduce motion — tone down the app's animations.
16. Keyboard Shortcuts
On Windows, Mac and Linux, you can get around Filie from the keyboard. On a Mac, press Cmd wherever the table says Ctrl. Items marked Home or Files work only on that screen.
| Shortcut | Description |
|---|---|
| Esc | Closes an open dialog or menu. In a text box, it leaves the box. Otherwise it goes back, just like the back arrow. In Files it first cancels a rename, then closes search, then ends selecting, and only then goes back. |
| Alt+Left Cmd+[ on Mac | Goes back, just like the back arrow. |
| Ctrl+1 to Ctrl+6 | Opens Home, Files, Subscription, History, Settings or About, in the same order as the main menu. |
| F5 | Refreshes Home or Files. |
| Page Up Page Down | Home. Scrolls up or down by a screenful. |
| Ctrl+A | Files. Selects everything shown in the folder. |
| Ctrl+F | Files. Opens search. |
| Ctrl+Shift+N | Files. Makes a new folder and lets you name it. |
| F2 | Files. Renames the one selected file or folder. |
| Delete Cmd+Delete on Mac | Files. Deletes the selected files, after asking you to confirm. |
Ready to start sending? Download Filie on all your devices.